You don't have any saved projects.

Help and Guides
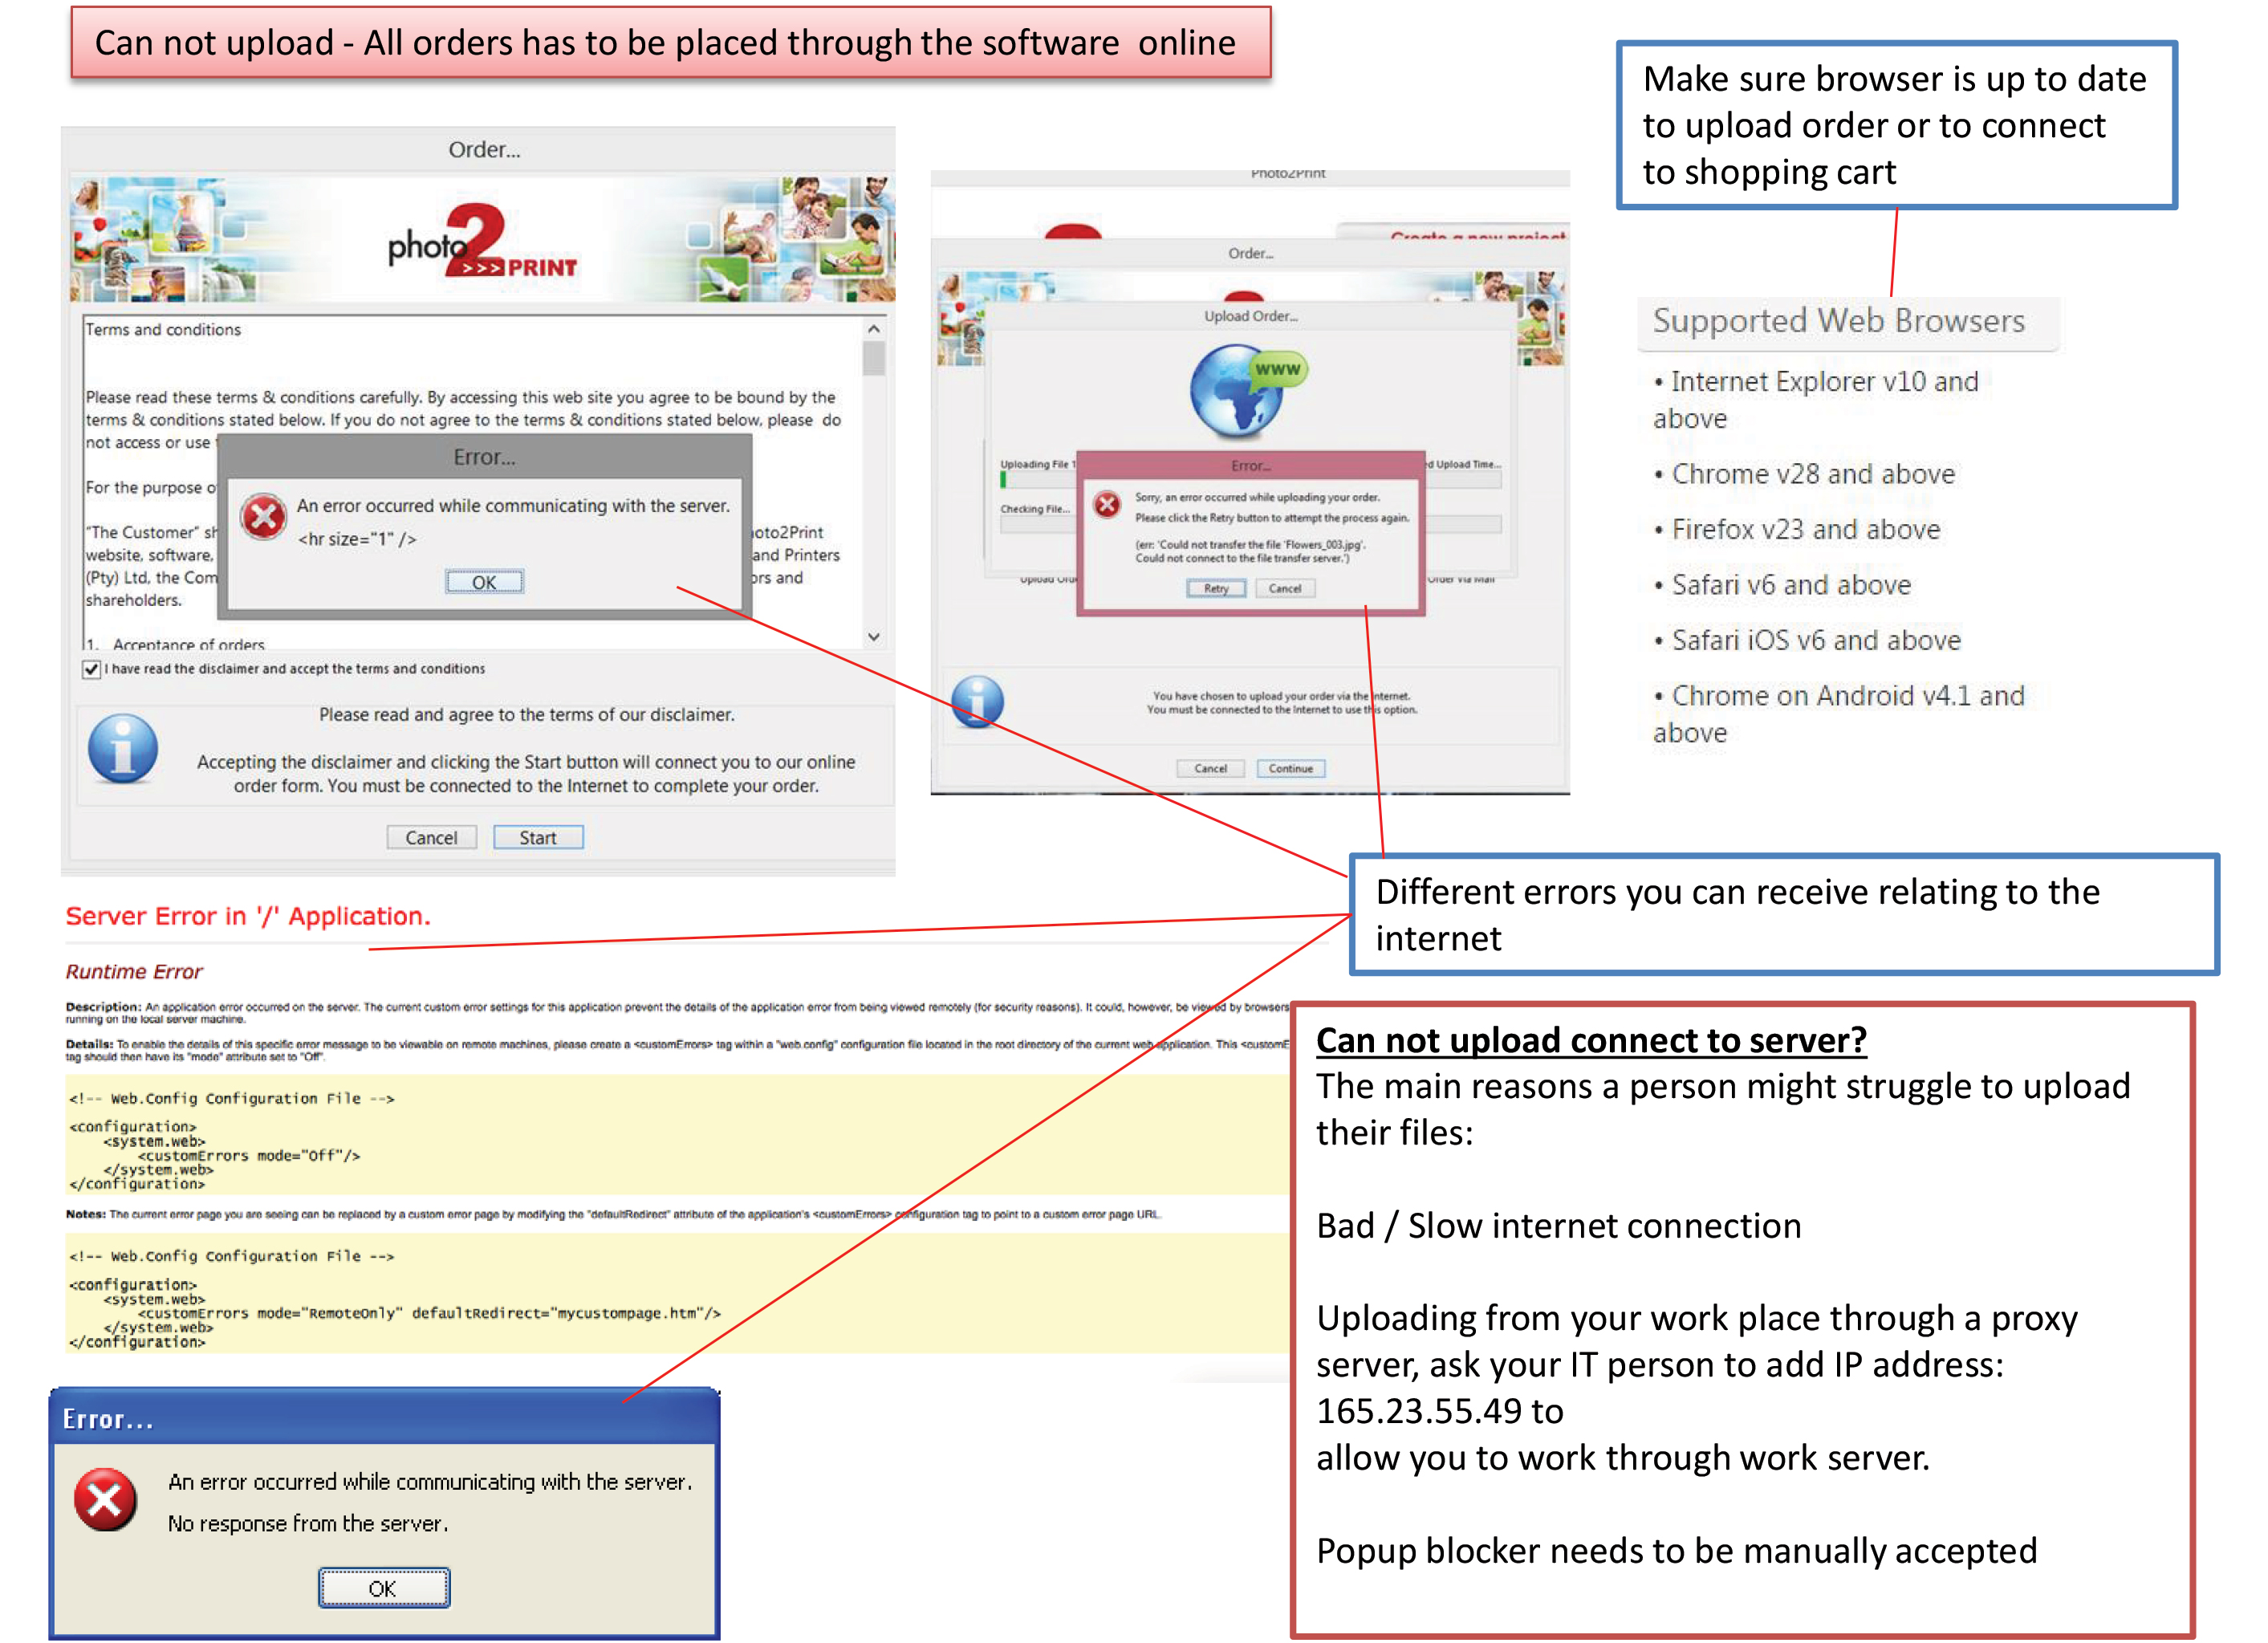
- • Your browser is out of date – please update your browser and try again
- • Incompatible browser for the website – try a different browser. We recommend Mozilla Firefox and Google Chrome
- • Check your internet connection
- • Clear your browser cache
- • Restore your browser settings to default
- • Change your browser ‘default’ file download folder
- • Firewall and/or Antivirus – depending on the configuration it could prevent the download of .exe or .dmg files, especially on a work network.
Please speak to your IT / Network person to allow access.
-
Windows
- • Internet Explorer v11 and above
- • Chrome v28 and above
- • Edge v20.10240 and above
- • Firefox v23 and above
- • Android OS 4.1 and above
- • Mac OSX – Chrome v28 / Safari v9 and above
- • Mac OSX – Firefox v23 and above
- • Mac iOS 9 and above – Safari/Chrome
- • Mac ipadOS 13 and above – Safari / Chrome
Mac OSX
NB!! Please make sure that you are not installing the software on a computer that has the ‘My Documents Folder’ located on a server. If this is the case, every time you are not connected to the server, you will not be able to locate your order or be able to save them.
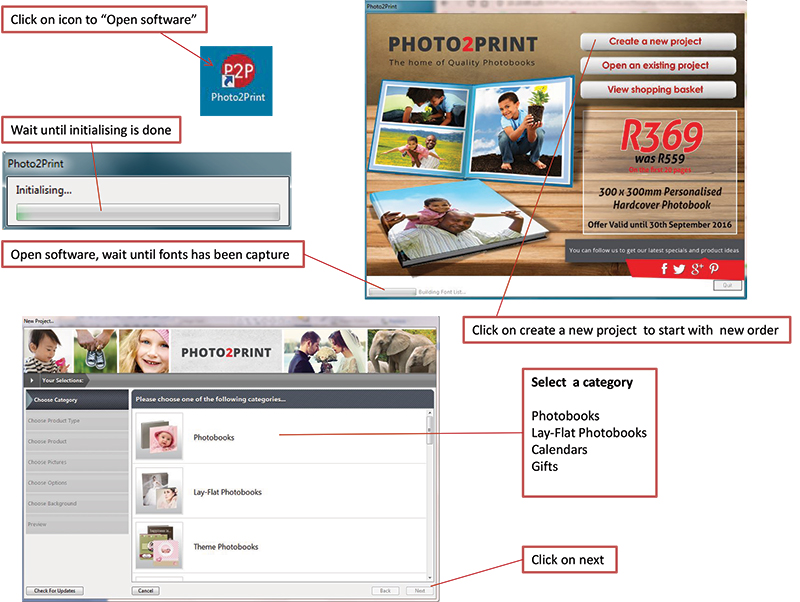
- Before you can start a project, you will need to download the software from our website www.photo2print.co.za
- Windows – your browser will prompt you to either ‘Run’ the installer file or ‘Save to Disk’. Click ‘Run’ and the installer file will start downloading.
When the download is complete you will be guided through the installation process by the installation wizard. After installation, an icon will appear on your desktop and the software will also appear in your Start Menu. To launch and run the software, simply double click on the icon. - Mac – depending on the browser you use, the download will either start automatically, or you will be prompted to click ‘Save File’.
Once the download has completed, simply double click on the installation file and follow the prompts – drag the software folder into the Applications folder – then you should be able to open the editor directly from your Applications. The icon can also be dragged down to the dock so that it is easily available.
If you are connected to the internet, you will be notified of any new updates when you launch your software. We recommend to update all items - select "Download All" to ensure all products, pricing, new products, page styles, backgrounds, scrapbook artwork etc.
The error is due to your current security settings. You will need to disarm ‘Gatekeeper’ on your Mac temporarily in order to install the software.
-
Please follow these instructions to Install:
- Click on the Apple icon on the top left of your screen
- Open System Preferences in the dropdown
- Click on the "Security & Privacy" icon
- This will open a new window – Under the "General" click on "Anywhere" under the section that says "Allow applications downloaded from"
- A pop-up will now ask you to confirm your choice "Allow from anywhere"
- You will now be able to install the software by dragging it into your applications folder. You will also be able to pin it to your task bar if you wish.
- NB!! We suggest that you revert your settings after installation to improve your security on your Mac.


Information
When Photo2print Designer downloads new Products and Application Library Items; it uses hidden folders to store this data. Photo2print Designer needs to sort the installed/downloaded content in a location specific to the local user on the local machine. It may be sometimes necessary to delete this downloaded data.
Solutions
The location of the folders is different depending on the operating system and is specific to the logged on users. So if two users have accounts on the same machine, they will each need to run check for Updates to gain access to new products and application items.
This will mean that two copies will exist.
In all cases listed below 'Username' is the folder for the user in question and 'Application Name' is the name of the Photo2print Builder as defined in the license key.
On Mac OSX
System Disk:Users:'Username':Library:Application Support:'Application Name'
On Windows XP
Drive:\Documents & settings\'Username'\Application data\'Application Name'
On Windows Vista and Windows 7
Drive:\Users\
'Username'\AppData\Roaming\'Application Name'


Issue
You cannot upload your projects and receive a “Could not transfer the file ‘Manifest’” error message.
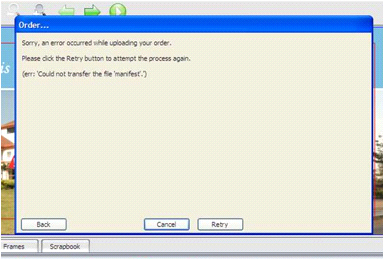
Technical Information
When an order is created, Photo2print Designer creates a file that contains a list of every file that will be uploaded; this file is called ‘The Manifest.’
During the Photo2print order upload process, the Manifest is the first file to be uploaded to the Photo2print Server.
-
Some common problem which could prevent the upload from working are;
- • No/limited connection to the internet
- • A router
- • A software firewall
- • Antivirus or anti-malware software
- • Or a combination of these factors
Please note: The manifest file is not damaged; the file should still be intact, but one of the issues above could be causing the error.
Solutions
Prior to reporting your manifest issue to Photo2Print, the above common problems need to be investigated to ensure that your error is not related to one of the above.
-
Please test the following:
- • Do you have a connection to the Internet? Can you connect to a webpage using their web browser?
- • Does your internet router/firewall allow FTP (21) connections to the internet?
- • Check the logs on the firewall to see if there is an entry concerning Photo2Print. If there are any logs, is the firewall is blocking the software?
- • Does your software firewall allow connections using the Photo2print application?
- • Does it allow FTP transfer on port 21? Photo2print requires a connection through port 21 for FTP.
- • Is their Anti-malware software blocking the file transfer?
- • Does the customer use a proxy in order to connect to the internet?
If you have tested all of these areas, restarted your system and the problems still persist, please contact your support team for further investigation.
Our new Online Designer uses HTML5 which means that you can easily access our software across a range of devices – including mobile, tablet and larger screen devices!
Heavily focused on User Experience, this HTML5 based tool boasts a range of features and seamless designer-to-cart user journeys allowing you to design and order beautiful photo products in as few clicks as possible! Our Online and Desktop Designers are purposefully built to complement each other, what’s more they serve different purposes.
Benefits on your new Online Designer
- • Quick and easy product creation;
- • Create photo products on the move;
- • Works cross platform – across a range of devices, including iPad and Android. Create photo products on the go!
- • Clever upload tool – start working on pictures right away;
- • Focused on the User Experience;
- • Works particularly well for first time Designer users.
Working with pictures in the Online Designer
The clever upload tool means that the Online Designer takes a high quality preview of each picture before the upload begins. This means you can start using your photos immediately while the high resolution picture uploads in the background;
- • Reuse pictures from previously purchased projects, with no need to re-upload;
- • The online picture rendering engine makes working with pictures extremely fast for you – it works behind the scenes, pre-processing the picture at various resolutions so that the closest matched size is always available.

In addition to this, our Online Designer supports a wide range of picture formats including

- • JPEG – RGB / CMYK / Greyscale
- • TIFF – RGB / CMYK / Greyscale
- • PNG – RGB / Greyscale
- • Alpha Channel – RGB / TIFF / PNG
The Clever upload tool does not support CMYK or Alpha Channels.
-
Windows
- • Internet Explorer v10 and v11
- • Chrome v28 and above
- • Edge v20.10240 and above
- • Firefox v23 and above
- • Android OS 4.1 and above
-
Mac
- • Safari v6, v7, v8 and v9
- • Safari and Chrome on iOS v9 and above
- • Chrome on Android OS 4.1 and above
Yes. You will be able to use the same login and password.
- • Go to the account management page https://www.myphotoproducts.co.za/ or go the Photo2print's website http://photo2print.co.za/ and click on Sign In.
- • Log into your account using your Online credentials
- • Once signed in , Click on "My Projects" to view your saved projects
- • You can select "Edit" to continue with your design


- • Alt+mouse curser = move image inside picture box
- • Command/Ctrl + Z = Undo
- • Command/Ctrl + Shift + Z = Redo
- • Command/Ctrl + (plus) = Zoom
- • Command/Ctrl + Shift + alt + (plus) = Max Zoom
- • Command/Ctrl + (minus) = Zoom Out
- • Command/Ctrl + alt + (minus) = Max Zoom Out
- • Command/Ctrl + C = Copy
- • Command/Ctrl + X = Cut
- • Command/Ctrl + V = Paste
- • Command/Ctrl + A = Select All
- • Command/Ctrl + Shift + B = Insert Rectangle Picture Box
- • Command/Ctrl + Shift + O = Insert Oval Picture Box
- • Command/Ctrl + Shift + T = Insert Text Box
- • Command/Ctrl + I = Insert Page
- • Command/Ctrl + Shift + D = Duplicate Page
- • Command/Ctrl + Shift + I = Add Page
- • Command/Ctrl + D = Delete Page
- • Command/Ctrl + F = First Page
- • Command/Ctrl + L = Last Page
- • Command/Ctrl + B = Previous Page
- • Command/Ctrl + N = Next Page
- • Command/Ctrl + R = Show/Hide Rulers
- • Command/Ctrl + ; = Show/Hide Guides
- • Command/Ctrl + ‘ = Show/Hide Grid
- • Command/Ctrl + G = Show/Hide Box Guides
- • Command/Ctrl + S = Save
- • Command/Ctrl + W = Close Project
- Mac Specific
- • Command/Ctrl + , = Preferences
- • Command/Ctrl + Q = Quit
- • Command/Ctrl + H = Hide Designer
- • Command/Ctrl + alt + H = Hide Others


New software uploads without internet
Client
Under My documents, there is a folder called “Photo2print Software Projects”
Prj File:

Select the order you would like to upload, zip that whole folder, also zip folder with all the pictures used in the book.
Store
1. Take the (prj) file the client sent you and copy it under My documents, there is a folder called “Photo2print Software Projects”
2. Copy the image folder onto your desktop.
3. Follow the missing images steps to open order and upload it
4. Use clients login to order.
Gloss UV finishes are a compound that is applied wet to paper and dried almost instantly using UV light. They give your product pages a glossy, smooth look and also provide a layer of protection to make sure your printed product looks better for longer.
Paper is measured in grams per square meter, or gsm. The higher the gsm, the thicker the paper. For example, normal office paper that you would use in your printer at work or at home is only 80 gsm, but the paper used in art books has a higher gsm. Matte art paper has a more refined look than normal paper and because the ink doesn’t soak into the paper, your images are clearer and the colours are brighter.
-
Matt Art Paper
- • 170gsm we use in our 200x200, 300x300, A4 Portrait and A4 Landscape photobooks
- • 250gsm we use in our A3 Landscape photobooks
- • Photographic Textured Paper with mounting board in-between use in our 200x200, 300x300, A4 Portrait, A4 Landscape, A3 Landscape and A3 portrait Lay Flat photobooks
Lay-Flat Professional paper
- • Matt Art paper and Matt laminated use in our 200x200, 300x300, A4 Portrait, A4 Landscape, A3 Landscape and A3 portrait Lay Flat photobooks
Lay-Flat Classic paper
Our A4 calendars are printed on 170gsm matte art paper as well, while our A3 calendars are printed on 300gsm matte are paper. Our diaries, journals and notebooks use 90gsm bond paper and the photo pages in the notebooks and journals use 148gsm matte paper.Our large format photos and photo prints are printed on 200gsm and 230gsm paper.
These terms refer to the coating on the paper. Bond paper (like every day printer paper) is uncoated and is perfect for printing large amounts of text or for writing on. Matte papers have a light coating to add more contrast to photos but reflects very little light. Glossy paper has a thicker coating, making it reflect more light. This paper is perfect to use when you need your images to pop more as it makes colours brighter and crisper.
-
Online Software Videos
- • Register a New Account
- • Forgotten your Password
- • How to Redeem your Voucher
- • Shopping Cart Flow
- • How to Install your PC Software
- • How to Install your MAC Software
- • Login to your Account
- • My Basket
- • My Project
- • Autoflow Tool
- • Cropping Tool
- • Easy Editor Tool
- • Switch between sizes
- • Zoom-In and Zoom-in Tool
- • Renaming and Deleting Orders
- • Changing Page Layouts
- • Upgrading your Project
- • Adding Pages
- • Adding Backgrounds
- • Adding Scrapbooking Elements
- • Adding Text & Text Effects
- • Adding a Mask
- • Adding Photo Effects
- • How to get to your Basket
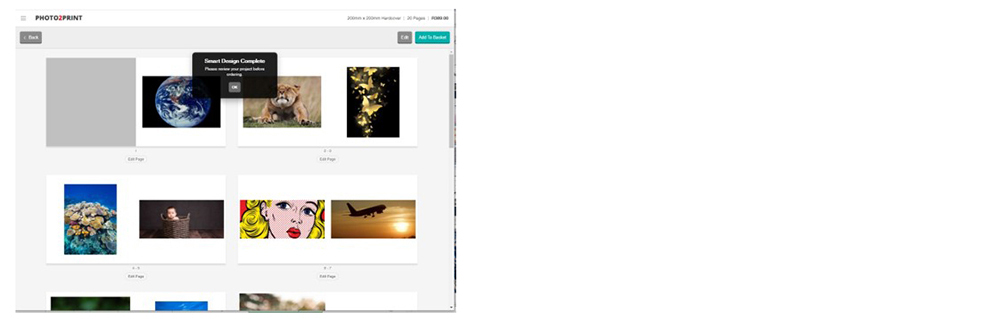
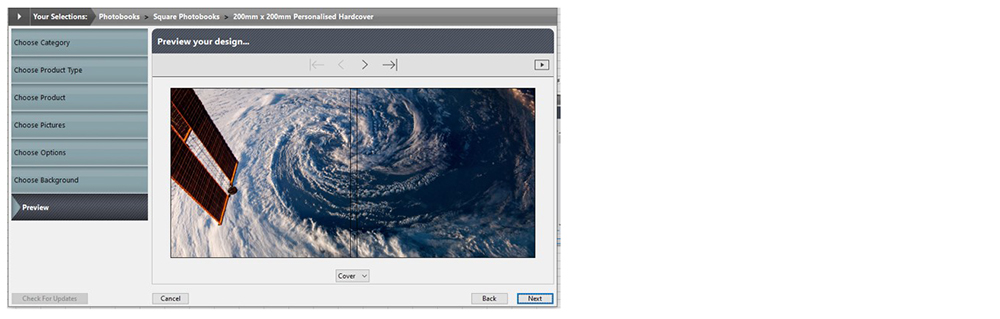
- • How to Preview your Project
- • How to rearrange pages
- • How to reorder a project
- • How to select a Project
- • How to order more than one Project
- • How to switch between Easy Editor and Advanced Editor
- • 200x300 Stretched Canvas
- • 200x300 Unfinished Canvas
- • A3 Photobook Hardcover
- • A4 Landscape Calendar
- • Block Mount
- • Box Mount
- • DVD Case
- • Layflat landscape photobook hardcover
- • Layflat portrait photobook personalised hardcover
- • Personalised Boxes
- • Personalised Hardcover 30x30
- • Personalised Mug
- • Personalised Softcover
- • Photo Prints
- • PUR Photobooks
- • Scatter Cushion
- • Wooden Blocks
- • Themed Book
- • Themed Mug
- • Themed Coasters
- • Themed Wedding Card
- • My Basket
- • My Project
- • Autoflow Tool
- • Cropping Tool
- • Switch between sizes
- • Zoom-In and Zoom-in Tool
- • Renaming and Deleting Orders
- • Updating your Software
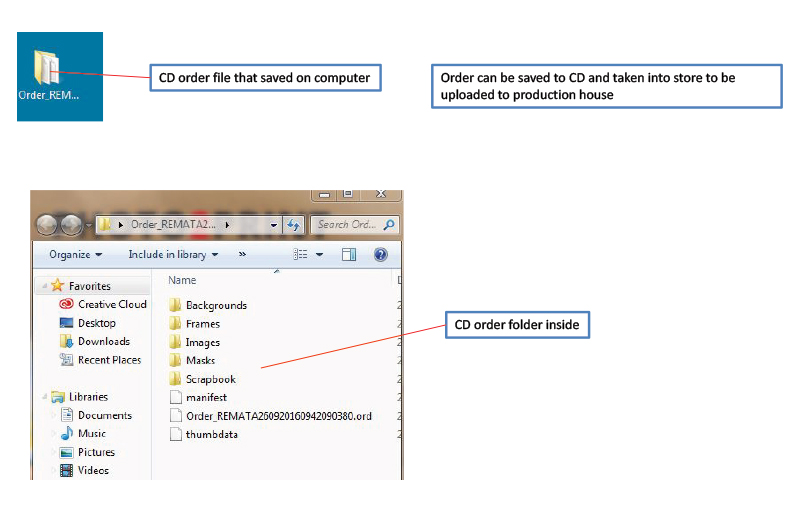
- • Uploading your order Online or to a CD
- • Changing Page Layouts
- • Upgrading your Project
- • Adding Frames
- • Adding Pictures to your Project
- • Adding Pages
- • Adding Backgrounds
- • Adding Scrapbooking Elements
- • Adding Text & Text Effects
- • Adding a Mask
- • Adding Photo Effects
- • How to place a Order
- • How to reorder a project with changs
- • How to reorder a project without changs
- • How to order more than one Project
- • How to return to your existing Project
- • How to Preview your Project
- • How to rearrange pages
- • 200x300 Stretched Canvas
- • 200x300 Unfinished Canvas
- • A3 Photobook Hardcover
- • A4 Landscape Calendar
- • Block Mount
- • Box Mount
- • DVD Case
- • Layflat landscape photobook hardcover
- • Layflat portrait photobook personalised hardcover
- • Personalised Boxes
- • Personalised Hardcover 30x30
- • Personalised Mug
- • Personalised Softcover
- • Photo Prints
- • PUR Photobooks
- • Scatter Cushion
- • Themed Book
- • Themed Mug
- • Wooden Blocks
Online 'How to Create a Project' Videos
Desktop Software Videos
Desktop 'How to Create a Project' Videos